

In this project, we are going to turn our BBC micro:bit into a digital thermometer, which will sense the temperature of the room by getting the temperature of the micro:bit’s components.
We’re also going to use this project as a chance to explore and create functions. A function allows us to group code, and use the same code in multiple places without having to rewrite it.
We’re also going to use some conditional programming, or logic, to draw an image on the micro:bit’s screen which represents how warm or cold the room is.
Part 1: Let’s make a function
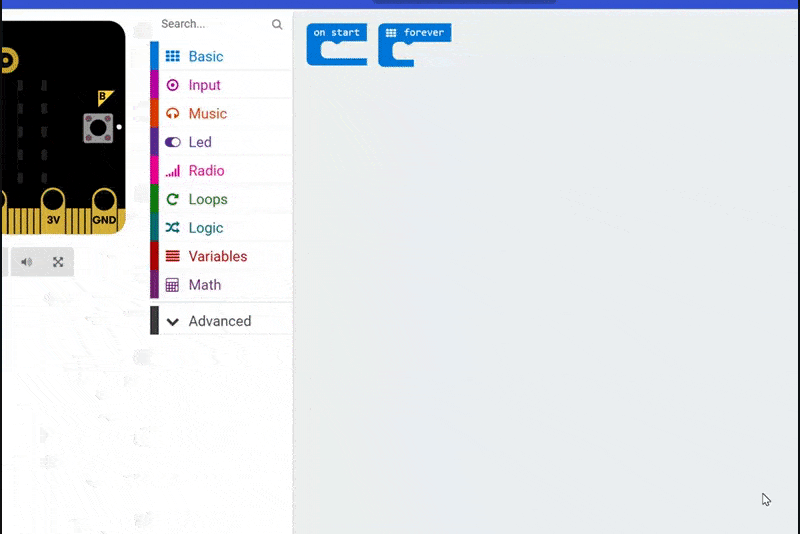
So, let’s build our thermometer using the BBC micro:bit’s JavaScript Blocks Editor. Let’s create a new project. And let’s call this app Thermometer App (we’ll name our app at the bottom of the screen so it is easy for us to find amongst our projects).
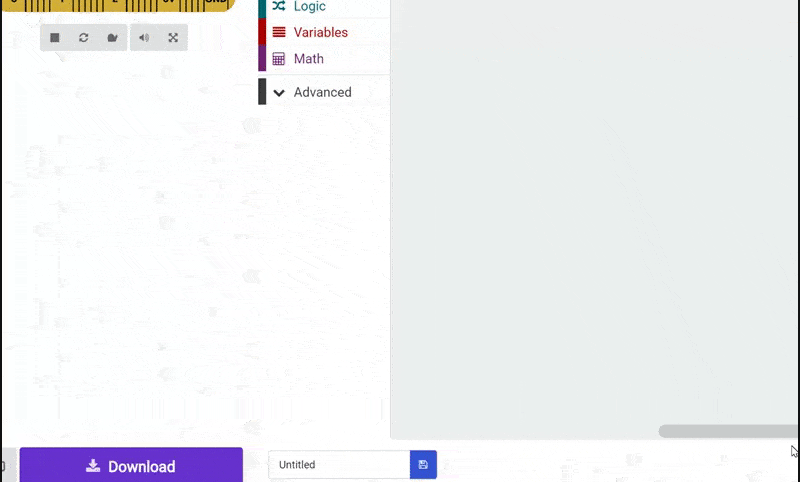
Let’s name our project so we can find it later.
Functions are a type of procedure or routine. Functions encapsulate a task, combining many instructions into a single line of code. When a function is called, the program “leaves” the current section of code and begins to run all of the code held within the function.
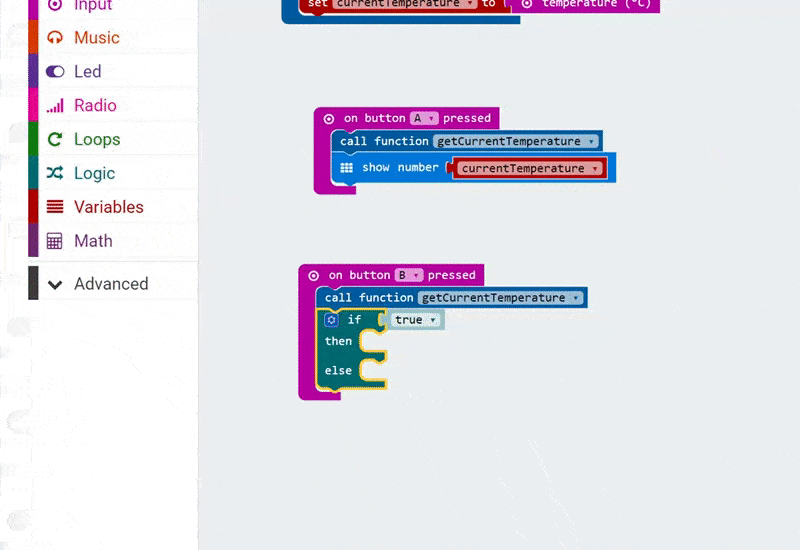
What we’re going to do here is create a function for getting the current temperature. We will then call this function from both the A Button and the B Button which will use the result of our function in different ways.
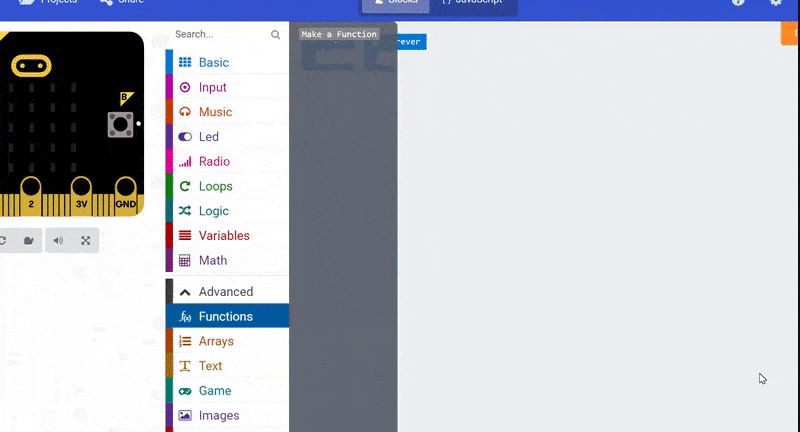
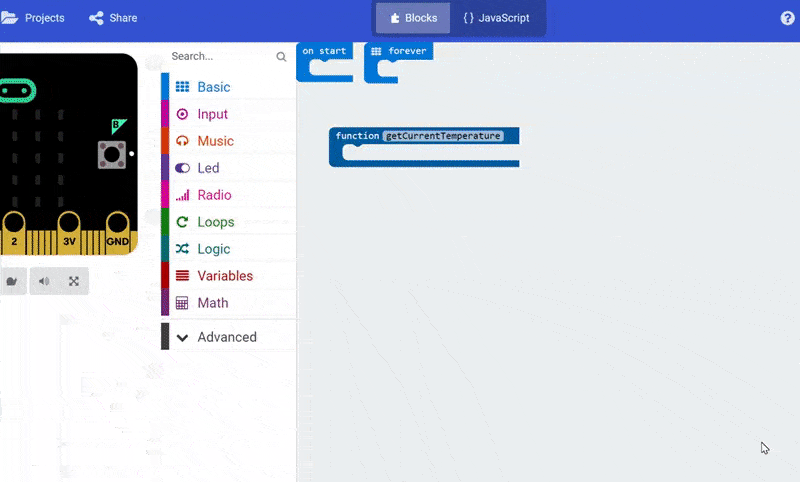
So, let’s begin by clicking on Advanced and then Functions.
Click on Advanced and then Functions to open the Functions menu.
At the moment, this menu is empty, so we’re going to click on Make a Function.
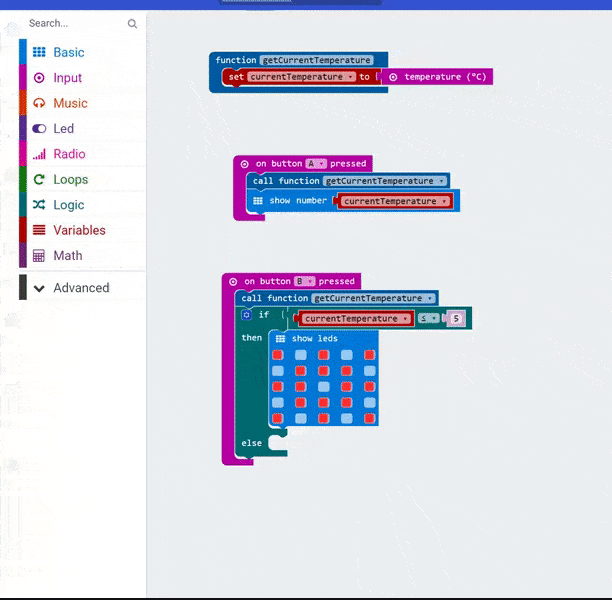
We’re then going to name our function. Let’s call our function getCurrentTemperature as that’s exactly what our function is going to do.
Let’s name our function!
By the way, our naming – having the function name all lower case, aside from capitalising the first letter of each word, apart from the first – is a naming convention in programming, known as Camel Case. As we can’t use spaces in function names or variable names in real programming languages, Camel Case allows our function names to remain descriptive but also easy to read. Compare getcurrenttemperature to getCurrentTemperature and you’ll see what I mean!
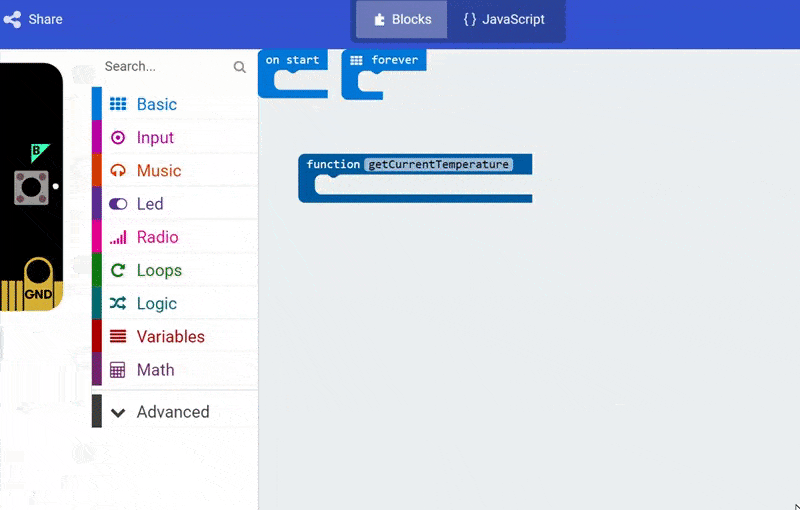
Once you’ve clicked Ok, you’ll see that the editor creates a Function block, with the name we gave it, on the screen. Let’s drag it down, below the current code, so we can use it.
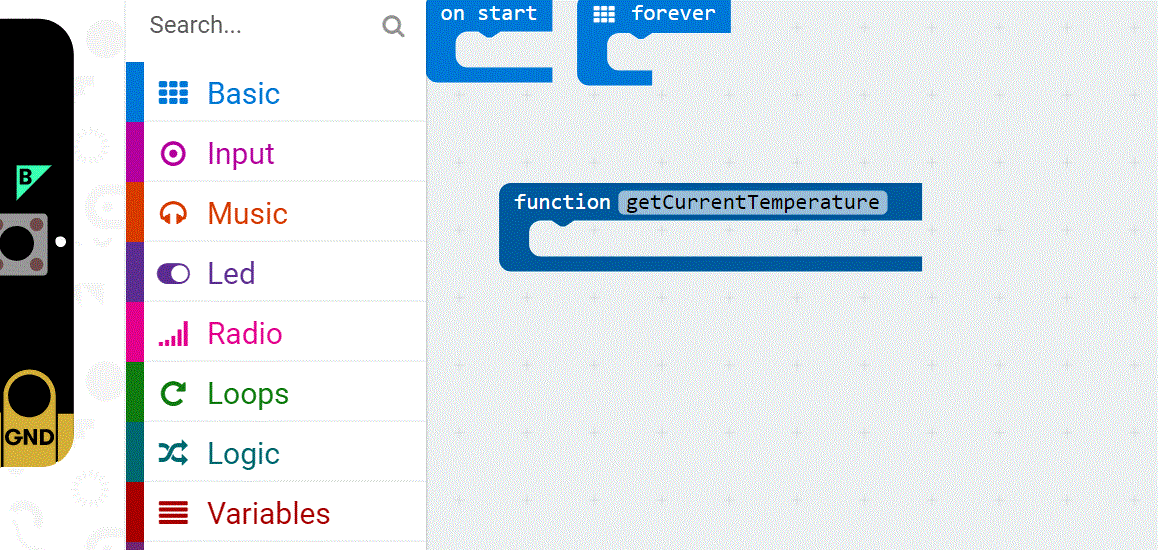
When we click on Ok, our function is automatically created, as a block, in our coding area.
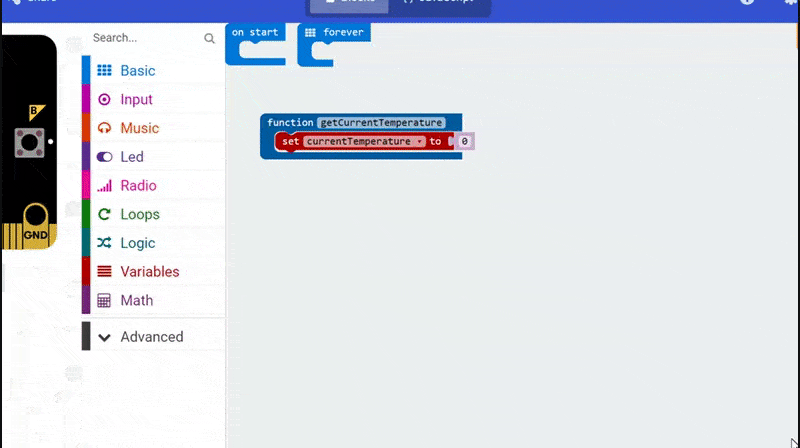
What we’re going to do next is create a variable which will store the temperature, so we can use it in our app.
Let’s click the Variables menu button, and Make a Variable.
Let’s create, and name, a variable which is going to store the temperature so we can use it in our code.
Now, let’s name our variable. We’re going to store the current temperature, so let’s name our variable currentTemperature, and click Ok.
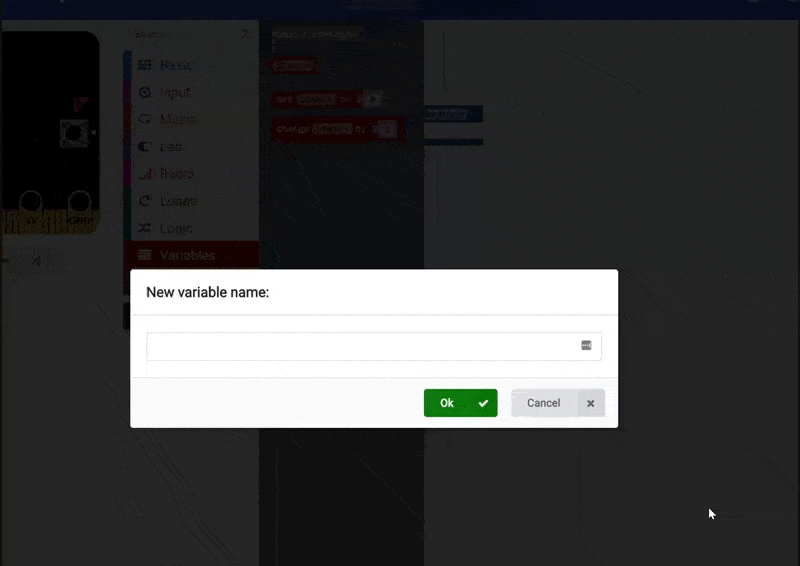
Our variable is going to be called currentTemperature.
You’ll see it creates an item in the variables menu, with the name we just gave it. We’re not going to use it just yet. What we are going to do though, is drag down a Set Item To block of code, from the Variables menu, and we’re going to drop it inside our Function getCurrentTemperature block.
Let’s grab a Set Item to 0 block of code.
We’re now going to change the variable listed in the Set Item To block so that it reads currentTemperature instead of item.
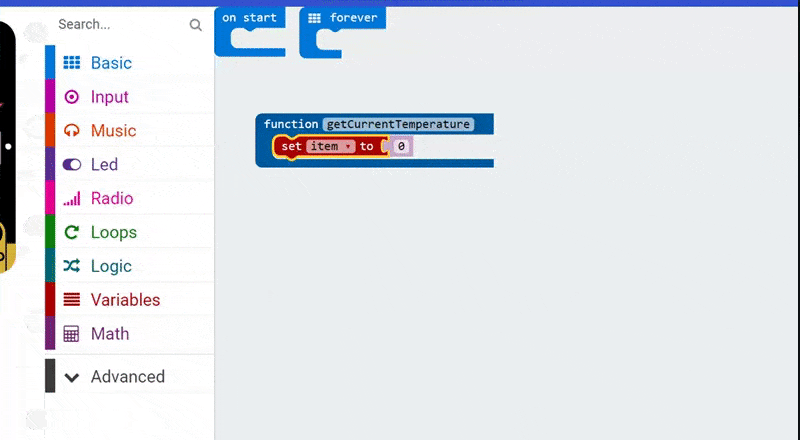
Let’s change our code so it reads Set currentTemperature to 0. We’re now using the variable we created a moment ago!
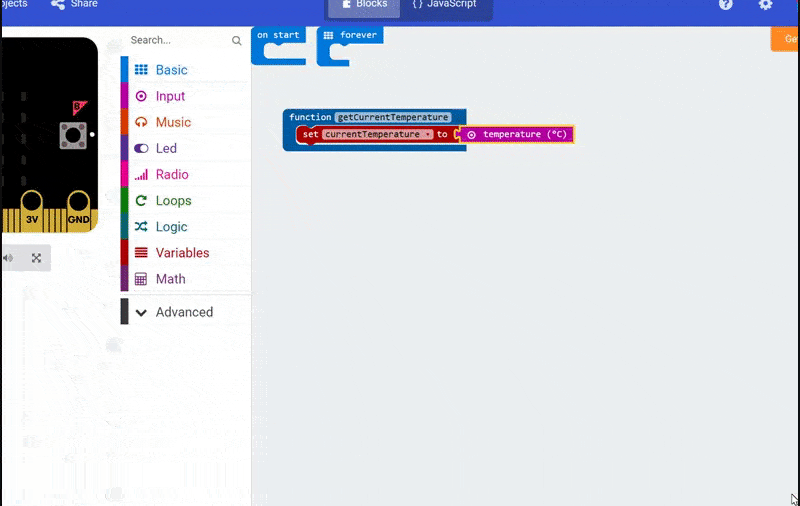
What we want to do now is to get the current temperature, so we can store it as the value of our variable. We need to use sensors to get the current temperature from our micro:bit so we are going to click on the Input menu, and we’re going to grab the block of code that uses the correct sensor. Let’s drag down the Temperature (°C) block and drop it at the end of our Set currentTemperature To block (replacing the 0).
Let’s get the Temperature (°C) block from the Input menu.
We are now letting the micro:bit get the current temperature, using its sensors, and we’re storing it as currentTemperature ready for us to use elsewhere in our code.
Part 2: Let’s display the temperature
So, we now know how to get the temperature from the micro:bit, but let’s use our newly created function to display the temperature on the micro:bit’s screen!
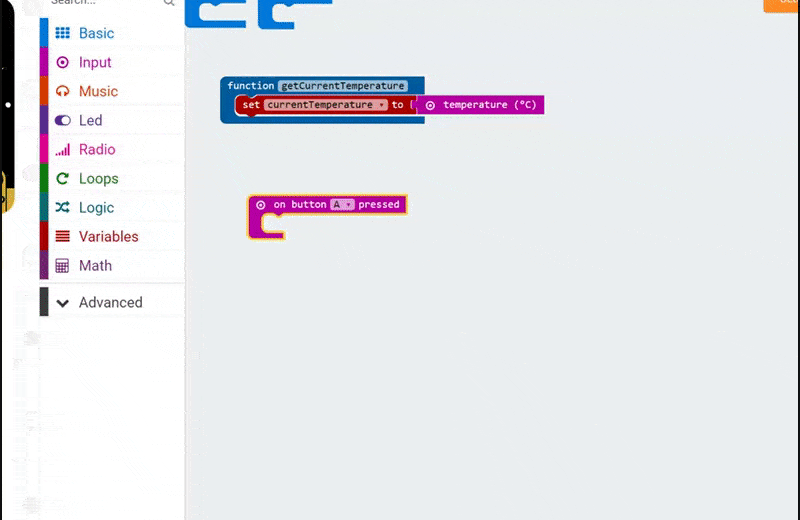
We’re going to use the A button to show the temperature on the micro:bit’s display. Let’s grab an On Button A Pressed block from the Input menu and drag that down to an empty space on the screen.
Let’s grab an On Button A Pressed block.
We now need to get the temperature before we can display it. Rather than writing our code here to do so, we’re just going to call the function we wrote earlier. Let’s click on the Functions menu (it’s in the Advanced section so, if you can’t see it, click on Advanced first), and you’ll see a line of code there called Call Function getCurrentTemperature. We’re going to drag that down into our On Button A Pressed block.
Now we’re calling our function!
When we press the A Button, the code inside our function will get called – so the micro:bit will get the current temperature and store it for us as the variable we created.
All that’s left to do now is to show the temperature on the screen. We know that the temperature is going to be a number, so we can grab a Show Number block from the Basic menu and drop that within our On Button A Pressed block, after our function call.

Now, let’s get a Show Number 0 block from the Basic menu.
All that’s left to do now is to show the stored temperature. Let’s click on the Variables menu and grab the block that represents our variable. Drag down the currentTemperature block and drop it at the end of our Show Number block, replacing the number 0.
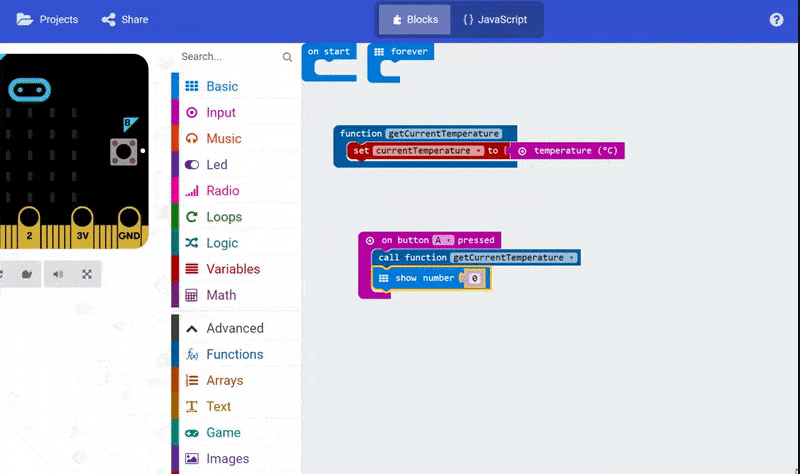
Drag down the currentTemperature block and drop it at the end of our Show Number block, replacing the number 0.
We now have a working thermometer! Click the A button on the emulator, or download your app and copy it onto your micro:bit (click here for instructions if you need them).
Challenge: If you want to, why not add a short delay after displaying the temperature, followed by the word degrees or the letter C (to represent degrees Celsius). See if you can figure out how to do that!
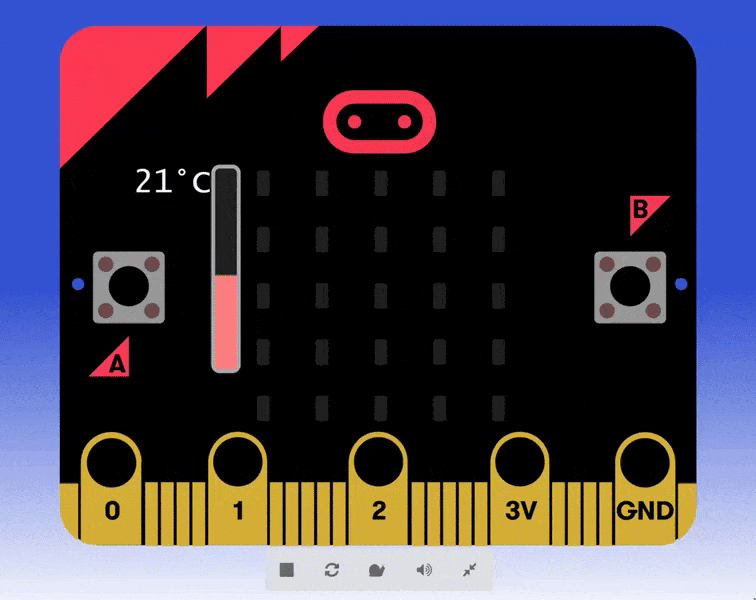
If you’re testing this on a micro:bit, you’ll see the real temperature of the room!
If you’re using the emulator, you’ll see a little thermometer will appear. This allows you to “set” the temperature of the “room” so you can pretend it is really warm, really cold, or somewhere in between! When you press the A button, you should see the temperature matches whatever you’ve set it to!
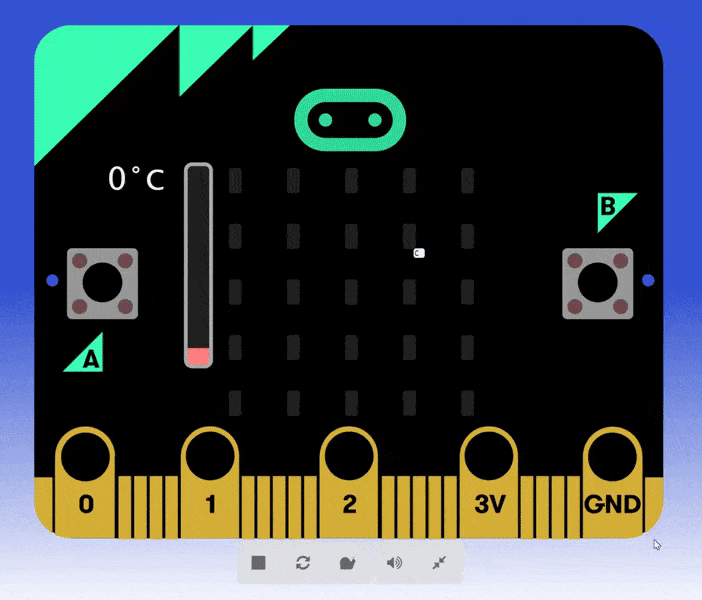
So, if I make my thermometer in the emulator 0 degrees…
…Then I test my app (by pressing the A button), I can see the temperate shown is also 0, so my code works great!
Well done!
Part 3: Let’s make a visual gauge
We now have a working thermometer! Our app gets the temperature using the micro:bit’s components and it displays it on the screen. But let’s take this a little bit further and write some logic into our app that would make our thermometer much more visual – just like a weather app on a phone.
What we’re going to build next is some code that, when we press the B button, will show us whether it is cold, warm, or hot in the room. And we’ll use our LED screen in order to do so.
There are multiple ways we could approach this (and for another approach, you should take a look at our Spirit Level app, where we use multiple If blocks), but we’re going to use If and Else in this project to check for the three conditions.
The first thing we’ll do is drag down the On Button A Pressed block from the Input menu, as this is the button we’ll use for this feature. We need to click on the letter A and change it to B so the code now reads On Button B Pressed.

Grabbing another On Button A Pressed block. Then we change the A to a B so it reads On Button B Pressed.
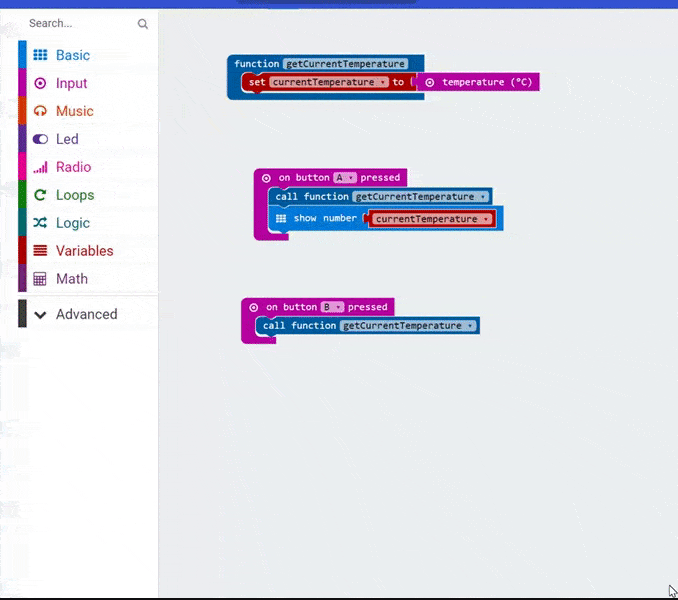
And now, we’re going to call our function we wrote earlier! This is the benefit of grouping code within functions, it allows us to reuse code without having to duplicate it!
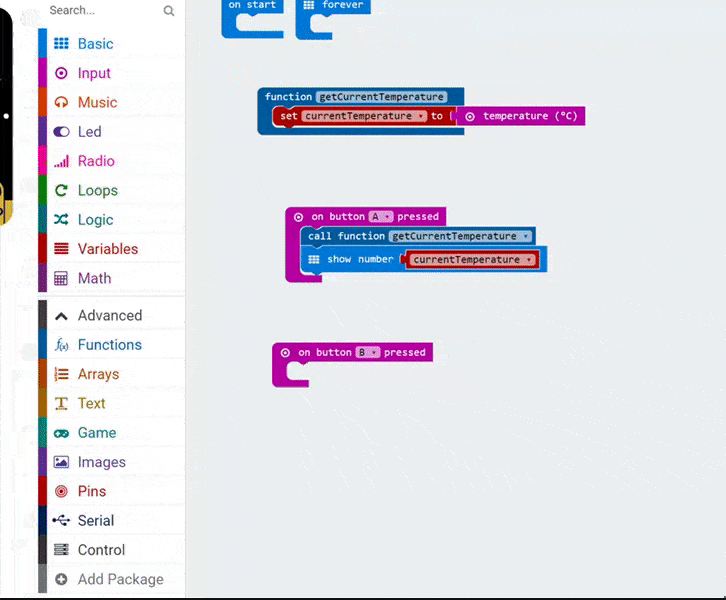
Calling our getCurrentTemperature function from our On Button B Pressed code.
Now, we can start checking for the three conditions. Let’s begin by checking to see if it is cold.
We’re going to click into the Logic menu, and we’re going to grab an If, Then, Else block of code, and we’ll put it underneath our function call.
Using an If, Then, Else block of code to start building our logic.
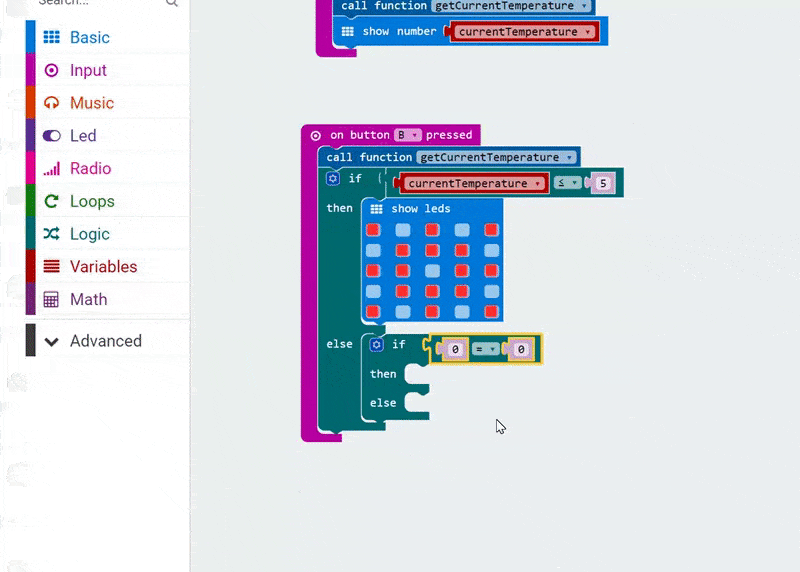
Now we can code up what we are checking for. We’re going to click on Logic again and grab a 0 = 0 block and we’re going to drop this next to If in the If, Then, Else block.
Grab a 0 = 0 block and drop this next to If in the If, Then, Else block.
We’re going to use this 0 = 0 block to write what we are checking for. We’re going to check to see if the temperature is 5 degrees of less.
So, let’s grab the currentTemperature block from the Variables menu and drop that over the first 0.
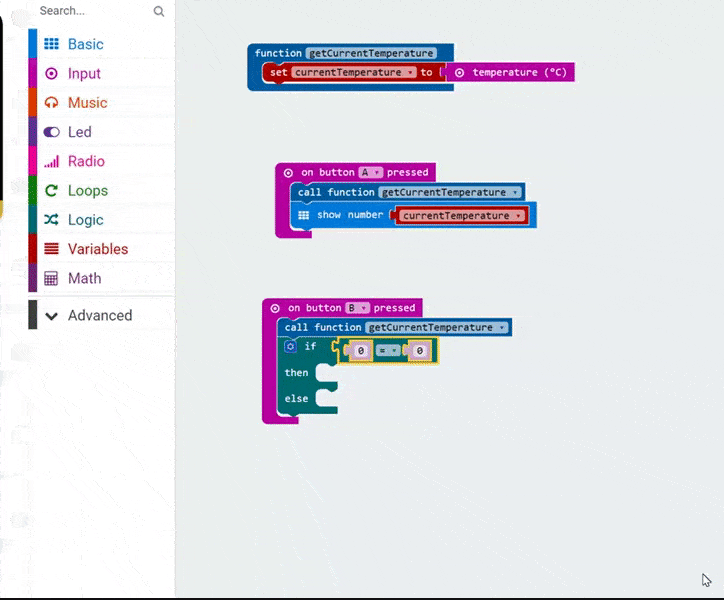
Grab the currentTemperature block from the Variables menu and drop that over the first 0.
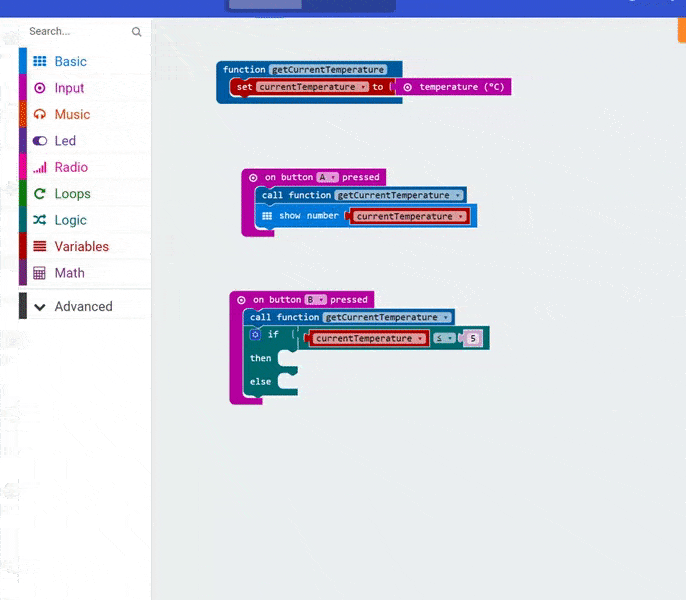
Now we’re going to check to fill in the rest of the sum. So let’s change the = symbol to the symbol for less than or equal to. We’re looking for the less than symbol (<) with the line underneath it! And let’s write the number 5 in the other part of the sum, so we’re now checking to see if the temperature is less than or equal to five degrees.
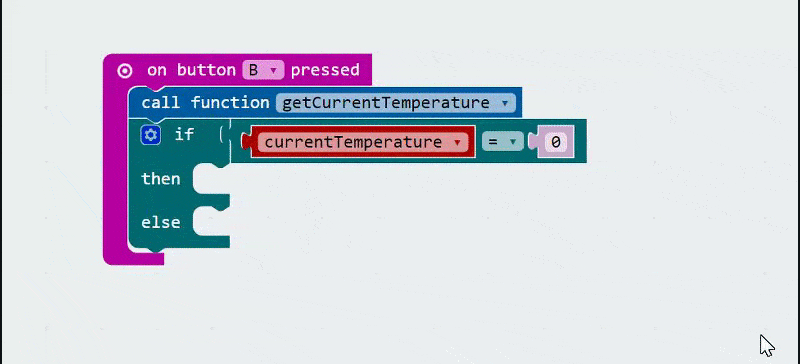
Changing the sum so it checks if the temperature is less than or equal to five degrees.
Now, we can grab a Show LEDs block from the Basic menu and drop it next to the word Then in our If, Then, Else block.
Now we’re going to use Show LEDs to display an image if the real temperature is less than, or equal to, five degrees.
Now we can draw a picture that shows that it is cold! I’m going to draw a snowflake, but you could draw some icicles, or a snowman, or a snowstorm, or a glove, or whatever you can think of!
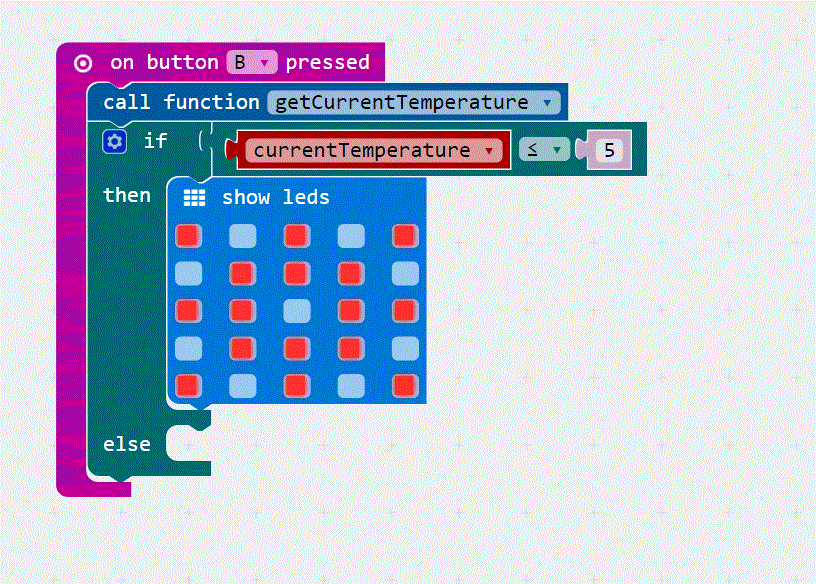
Draw an image that will show if the temperature is five degrees or less.
Now take a look at the Else bit of the If, Then, Else block.
If the temperature is NOT five degrees or less, the code in the Else bit of that block will run. Think of the word Else as meaning Otherwise!
What we’re going to do is grab another If, Then, Else block and drop it next to the Else in our existing logic. We are nesting code here!
Now we’re adding another If, Then, Else block and we are nesting it next to the Else in our existing logic.
We’re going to build some logic here to check if the temperature is twenty degrees or more. See if you can do this yourself, but if you get stuck take a look at my code below.

Building logic to check if the temperature is 20 degrees or higher.
Building logic to check if the temperature is 20 degrees or higher.
So your new block of code should check if the temperature is greater than or equal to 20.
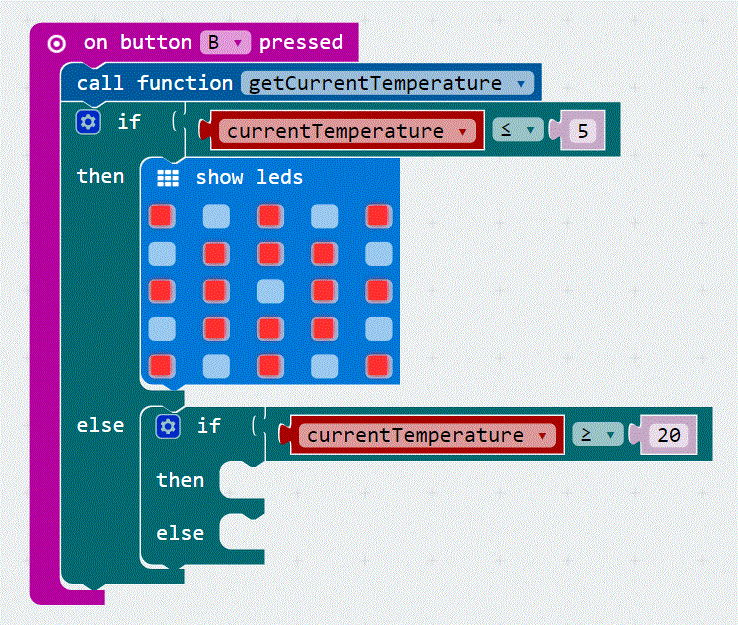
Building logic to check if the temperature is 20 degrees or higher.
Now we can draw a picture (using another Show LEDs block) that represents it is warm! You could draw a fire flame, sunshine, a bucket and spade (tricky!). I’m going to draw an ice-lolly!
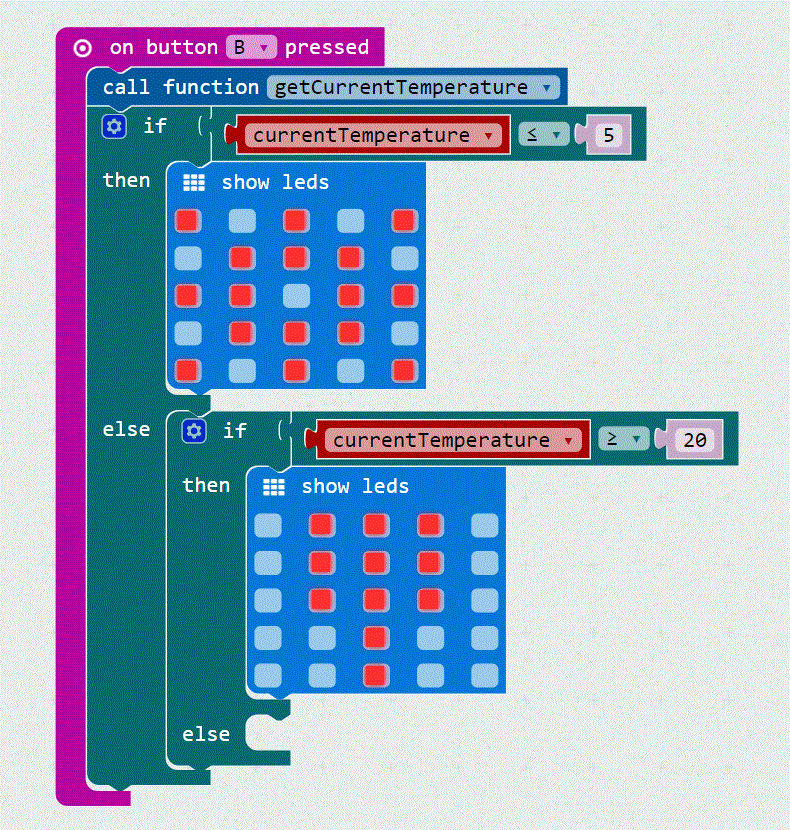
Now we’re using another Show LEDs block to draw a picture that will display if the temperature is 20 degrees, or higher.
Now let’s think about what our code is doing.
First we’re checking to see if the temperature is five degrees or less and drawing an image. Otherwise, we’re moving on and checking to see if it is twenty degrees or more. If it is, we’re showing our second image. Otherwise, the code in the final Else will run. The code in this Else will run if the other two things ARE NOT true!
So we can finish this app by drawing a picture using a final Show LEDs block that indicates it is warm. Not too cold! Not too hot! I’m going to draw a happy face here to indicate it is a nice temperature. I’m not going to freeze or burn!
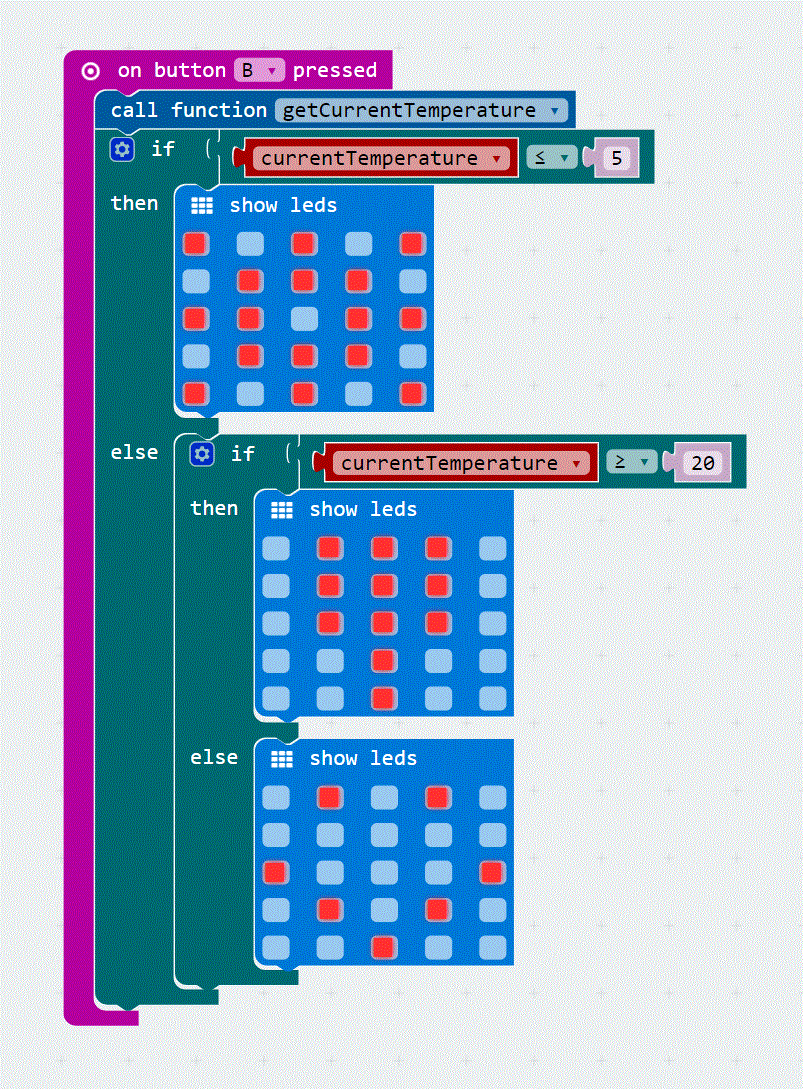
Our finished logic, which shows a third image if the temperature is higher than 5 degrees, but less than 20 degrees.
And now we have a finished app! Test it in your emulator, or copy the final app onto your micro:bit!
Congratulations! You have built a thermometer and, using your device, you can be a pretty decent meteorologist!
